> For the complete documentation index, see [llms.txt](https://docs.brainboard.co/llms.txt). Markdown versions of documentation pages are available by appending `.md` to page URLs; this page is available as [Markdown](https://docs.brainboard.co/settings/authentication/sso.md).

# Single sign-on (SSO)

### Introduction

{% hint style="warning" icon="info" %}
This feature is available only in the <mark style="color:$primary;">**`Enterprise`**</mark> plan and must be configured with the support team.
{% endhint %}

<mark style="color:$primary;">**Brainboard**</mark> offers **SAML** integrations to **Enterprise** accounts so that admins can easily manage users' access via their **IDP.**

{% hint style="success" %}
At <mark style="color:$primary;">**Brainboard**</mark>, we support both <mark style="color:blue;">**`SAML 2`**</mark> (recommended) & <mark style="color:blue;">**`OIDC`**</mark>.
{% endhint %}

<mark style="color:$primary;">**Brainboard's**</mark>**&#x20;SAML** integration allows you to connect <mark style="color:$primary;">**Brainboard**</mark> to your **IDP** so all users in your <mark style="color:$primary;">**Brainboard**</mark> organization can quickly and securely authenticate through your **IDP** using **SSO**. New users will automatically be created in <mark style="color:$primary;">**Brainboard**</mark> when they sign in for the first time after being allowed in your **IDP.**

Once **SSO** is enabled for your organization, you will have your own tenant at <mark style="color:$primary;">**Brainboard**</mark> with a dedicated **URL** with the following format: <mark style="color:blue;">**`https://xxx.app.brainboard.co`**</mark>

### Setup

#### 1. Tenant information

To get your tenant, you must reach out to the support team.

It might be shared by the <mark style="color:$primary;">**Brainboard**</mark> team via email before the first onboarding session.

#### 2. Set up SAML or OIDC in your IDP

{% tabs %}
{% tab title="SAML" %}
**SAML 2.0** standard is supported.&#x20;

Information needed to configure the SAML connection in your IDP:

| Identifier (Entity ID)                                       | <https://auth.brainboard.co/realms/{TENANT}>                                                           |
| ------------------------------------------------------------ | ------------------------------------------------------------------------------------------------------ |
| <mark style="color:$primary;">**Reply/Assertion URL**</mark> | <mark style="color:blue;">**`https://auth.brainboard.co/realms/{TENANT}/broker/saml/endpoint`**</mark> |
| <mark style="color:$primary;">**Sign on URL**</mark>         | <mark style="color:blue;">**`https://{TENANT}.app.brainboard.co`**</mark>                              |
| {% endtab %}                                                 |                                                                                                        |

{% tab title="OIDC" %}

1. During the app creation, you need to allow the following redirect\_uri: <mark style="color:blue;">**`https://auth.brainboard.co/realms/{TENANT}/broker/microsoft/endpoint`**</mark>
2. Then please share the following information:
   * Tenant ID
   * Application ID
   * Secret value (You can use [https://privatebin.brainboard.co](https://privatebin.brainboard.co/) and send our team the link after)

If you need any help, reach out to our team.
{% endtab %}
{% endtabs %}

{% hint style="info" %}
Do not forget to replace <mark style="color:blue;">**`{TENANT}`**</mark> with your tenant shared by the team.
{% endhint %}

<mark style="color:$primary;">**Brainboard**</mark> will automatically configure the following mappers **(Azure Entra ID standard)**:

<table><thead><tr><th width="164.4921875">User attribute</th><th width="109.1146240234375">Required</th><th width="599.6875">Attribute Name</th></tr></thead><tbody><tr><td><mark style="color:$primary;"><strong>email</strong></mark></td><td>Required</td><td><mark style="color:blue;"><strong><code>http://schemas.xmlsoap.org/ws/2005/05/identity/claims/emailaddress</code></strong></mark></td></tr><tr><td><mark style="color:$primary;"><strong>firstname</strong></mark></td><td>Required</td><td><mark style="color:blue;"><strong><code>http://schemas.xmlsoap.org/ws/2005/05/identity/claims/givenname</code></strong></mark></td></tr><tr><td><mark style="color:$primary;"><strong>lastname</strong></mark></td><td>Required</td><td><mark style="color:blue;"><strong><code>http://schemas.xmlsoap.org/ws/2005/05/identity/claims/surname</code></strong></mark></td></tr><tr><td><mark style="color:$primary;"><strong>groups</strong></mark> <sub>(see below)</sub></td><td>Optional</td><td><mark style="color:blue;"><strong><code>http://schemas.microsoft.com/ws/2008/06/identity/claims/groups</code></strong></mark></td></tr><tr><td><mark style="color:$primary;"><strong>organization_role</strong></mark></td><td>Optional</td><td><mark style="color:blue;"><strong><code>organization_role</code></strong></mark></td></tr></tbody></table>

#### 3. Automatic team provisioning and association from IDP Groups \[Optional]

Brainboard supports automatic team provisioning and association.

Every time users log in, they will be assigned to their respective team using the IDP Groups. The team will be created if it doesn't exist yet.

**Azure Entra ID**

1. In **Azure Entra ID,** open the <mark style="color:blue;">**`Enterprise Application`**</mark> - <mark style="color:blue;">**`Single sign-on`**</mark>
2. Edit the <mark style="color:blue;">**`Attributes & Claims`**</mark>
3. Add a <mark style="color:blue;">**`Group claims`**</mark> with the following configuration:

* Groups assigned to the application
  * **Source attribute:** cloud-only group display names\
    (or any option to share a friendly name to <mark style="color:$primary;">**Brainboard**</mark> — this attribute will be used for **Teams**' names)

<div data-with-frame="true"><figure><img src="/files/fnyZZFLAU8q7t8d6luzJ" alt=""><figcaption><p>Azure Entra ID - Group claims</p></figcaption></figure></div>

**Okta IDP**

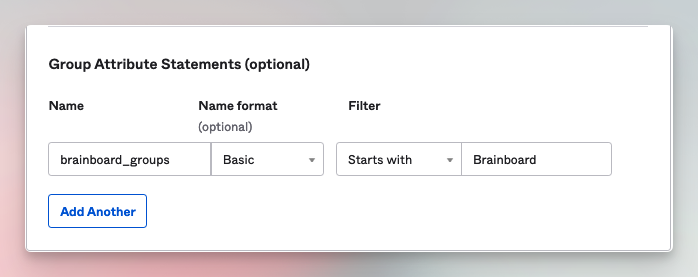
For **Okta**, you need to set up the **Group Attribute Statements** like this:

<div data-with-frame="true"><figure><img src="/files/lKyhcz5rpW1rQrtWQz8H" alt="Okta IDP - Group Attribute Statements"><figcaption></figcaption></figure></div>

{% hint style="info" %}
If you have a specific provider, please reach out to our support team to help you configure it.
{% endhint %}

#### 4. Share your IDP metadata

To finalize the configuration, you must share your **IDP metadata** (<mark style="color:blue;">**URL**</mark> or <mark style="color:blue;">**XML**</mark> file) with the <mark style="color:$primary;">**Brainboard**</mark> support team.

The team will get back to you to confirm your new tenant URL and run a few tests if needed.