> For the complete documentation index, see [llms.txt](https://docs.brainboard.co/llms.txt). Markdown versions of documentation pages are available by appending `.md` to page URLs; this page is available as [Markdown](https://docs.brainboard.co/cloud-design/code-edition.md).
# Code Panel
{% hint style="warning" icon="circle-info" %}
**ALPHA FEATURE NOTICE**
Code Edition is currently an Alpha feature. This means it's under development. We encourage [feedback](/help-and-faq/support.md) to help us improve it!
{% endhint %}
## Code Panel: Directly Edit Your Terraform Code
Brainboard's **Code Edition** feature allows you to directly view and modify the auto-generated Terraform HCL code for your cloud infrastructure designs. While Brainboard promotes a "**design-first**" approach where configurations are primarily managed through the visual interface and [Resource Configuration](/cloud-design/right-panel/resource-configuration.md) panel, **Code Edition** provides flexibility for users who are comfortable with or prefer direct code manipulation for specific tasks.
Code panel banner
## Why Use Code Edition?
* **Flexibility:** Make specific changes or additions to your **Terraform** code that might be quicker or more intuitive for code-centric users.
* **Familiar Environment:** For users accustomed to writing **Terraform,** this offers a direct way to interact with the configuration.
* **Quick Fixes:** To rapidly address minor issues or apply specific configurations directly in the code.
* **Pasting Existing Code:** Incorporate snippets of **Terraform** code from documentation or other sources (with some considerations, see "**Pasting New Resources**" below).
## Accessing and Using Code Panel
The **Code** panel is always visible on the right-hand side of the Brainboard design canvas.
### **Select a File**
At the top of the **Code** panel, you'll find a file selector. You can choose from standard **Terraform** files like:
* **`main.tf`**
* **`variables.tf`**
* **`locals.tf`**
* **`outputs.tf`**
{% hint style="warning" %}
Note: **`providers.tf`** and **`backend.tf`** are not yet editable through this feature to maintain Brainboard's core functionality.
{% endhint %}
### **View Code**
The content of the selected file will be displayed in the editor.
### **Edit Code**
Simply click into the code editor and begin making your changes.
{% hint style="info" %}
The editor is based on **Monaco Editor** (the same editor that powers **VS Code**) and provides:
* Syntax highlighting for **Terraform HCL.**
* Search (**`CMD/CTRL+F`**).
* Find and Replace (**`CMD/CTRL+H`**).
*👉🏻 Future enhancements may include suggestions, linting, and more advanced features.*
{% endhint %}
### **Saving Changes**
1. To save your changes, press **`CMD+S`** (on macOS) or **`CTRL+S`** (on Windows/Linux).
2. Upon saving, **Brainboard** will:
1. **Parse** the modified code.
2. **Validate** the **HCL** and **Terraform** syntax. **Errors** will be displayed if issues are found.
3. **Transform** the changes into Brainboard's internal format.
4. **Update** the visual diagram if your code changes imply structural modifications (e.g., adding new resources, creating connections).
5. And finally, re-generate the relevant Terraform files.
{% hint style="warning" icon="note-sticky" %}
New resources added via code will typically be appended to the diagram and may need to be manually repositioned.
{% endhint %}
#### **Discarding Unsaved Changes**
To discard any unsaved modifications you've made directly in the editor without saving, you can use the shortcut **`CMD+SHIFT+R`** (macOS) or **`CTRL+SHIFT+R`** (Windows/Linux).
#### **Unsaved Changes on Navigation**
If you attempt to leave the page or navigate away with unsaved changes in the code editor, you will be prompted to either **`Continue editing`****,** **`Discard changes`****,** or **`Save changes`****.**
## How Code Interacts with the Visual Diagram
Brainboard aims for a synchronized experience between the visual design and the code:
{% hint style="info" icon="code" %}
### **Diagram/Resource Configuration to Code**
Any modifications made to your infrastructure through the visual diagram (dragging, moving resources) or by configuring resources via the [Resource Configuration](/cloud-design/right-panel/resource-configuration.md) panel will automatically trigger **re-generation** of the relevant **Terraform code**, which you will see updated in the **Code** panel.\\
{% endhint %}
{% hint style="info" icon="diagram-project" %}
### **Code to Diagram**
Changes saved in the Code Editor that define new resources or modify existing ones in a way that impacts the diagram's structure (e.g., adding a `resource` block) will be reflected visually. New resources are typically appended to the diagram and may require manual placement.
{% endhint %}
## Key Features and Behaviours
### **1. Syntax Highlighting**
Makes reading and editing **Terraform HCL** easier.
### **2. Code Validation**
On save, Brainboard validates the **HCL** syntax and basic **Terraform** structure. Errors will be reported to help you fix them.
### **3. File Management**
You can view and edit code within predefined files (**`main.tf`**, **`variables.tf`****, ****`terraform.tfvars`****, ****`locals.tf`****).**
### **4. Moving Resources to Different Files**
While you cannot create new files directly from the **Code** panel *yet*, you can reassign a resource to a different file (or create a new logical file group for it) by **right-clicking the resource** in the diagram and selecting ["Edit TF filename."](/cloud-design/autogenerated-code/split-code-into-files.md)
After reassigning, you can then edit the resource's code within its newly designated file in the **Code** panel.
### **5. Warnings for Misplaced Blocks**
Brainboard expects certain definitions to reside in specific files. For example, **`variable`** blocks should be in **`variables.tf`** and **`locals`** blocks in **`locals.tf`**.
{% hint style="warning" %}
If you define a **`variable`** block in **`main.tf`**, upon saving, Brainboard automatically move the defined variable to the appropriate file (e.g., **`variables.tf`**).
{% endhint %}
### Important Limitations (ALPHA)
As **Code** is an ***Alpha*** feature and **Brainboard** primarily manages infrastructure through its structured visual paradigm, there are some important limitations to be aware of:
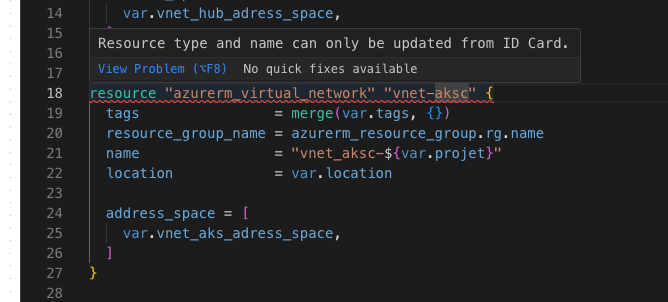
1. **Resource Renaming:** You cannot rename a resource (e.g., changing **`resource`** **`"azurerm_virtual_network""vnet-aksc"`** to **`resource`** **`"azurerm_virtual_network""my_new_vnet"`**) directly in the **Code** panel yet. The resource name is a critical part of its identifier within Brainboard.
{% hint style="info" icon="pen-field" %}
**How to Rename**
To rename a resource, please use the **Resource Configuration** panel. Brainboard will then automatically propagate this name change throughout your configuration, updating all references to ensure consistency.
{% endhint %}
2. **Supported Feature Only:** Only **Terraform** configurations and structures that are supported by Brainboard's GUI (the visual designer and **Resource Configuration** panel) are guaranteed to be preserved.
3. **No Comment Preservation:** Comments in the code are currently **not saved** or preserved. When Brainboard parses and re-generates the code, comments will be stripped out.
4. **No Attribute or Block Order Preservation:** The order of attributes within a resource block or the order of blocks within a file may not be preserved. Brainboard will re-generate the code based on its own ordering rules.
5. **Restricted File Edits:** Certain files are crucial for Brainboard's operation, such as **`providers.tf`** or **`backend.tf`**, and are generally not editable, or changes might be overwritten.
6. **Pasting New Resources:** When pasting a new resource block from external documentation:
1. The resource will be created.
2. It will be appended to the right side of your diagram and will likely need to be manually moved to the desired position.
### Customizing the Editor
You can customize some aspects of the **Monaco** editor's appearance and behaviour:
1. Ensure the design canvas (diagram area) has focus (click on an empty space in the diagram).
2. Press **`CMD+K`** (macOS) or **`CTRL+K`** (Windows/Linux).
3. In the **command palette** that appears, search for and select **`update editor settings.`**
4. An **`Editor configuration`** dialogue will appear, allowing you to change settings like **`fontSize`**, **`fontWeight`**, **`lineNumbers`**, **`tabSize`**, etc., in a **JSON** format.
5. Click "Confirm" to apply your changes or "Reset to default" to revert.
The command palette modal/dropdown that appears after pressing CMD/CTRL+K, with "update editor settings" typed in the search bar and the option highlighted.
### Best Practices
{% hint style="success" icon="file-arrow-down" %}
**Save Frequently**
Use **`CMD/CTRL+S`** regularly to save your changes and ensure they are parsed and validated by Brainboard. Also, remember **`CMD/CTRL+SHIFT+R`** if you need to quickly discard unsaved changes in the editor.
{% endhint %}
{% hint style="success" icon="code" %}
**Prioritize Visual Design for Structure**
For major structural changes, adding new resources, or defining relationships, it's often best to use the visual designer and **Resource Configuration** panel. Use the **Code** panel for fine-tuning or specific code-level adjustments.
{% endhint %}
{% hint style="success" icon="comment-lines" %}
**Understand the Re-generation Process**
Be aware that Brainboard parses your code changes and then re-generates the files. This is why comments and exact formatting may not be preserved.
{% endhint %}
{% hint style="success" icon="magnifying-glass-arrows-rotate" %}
**Check Diagram After Code Changes**
If you add or significantly modify resources via code, always **review** the visual diagram to ensure the changes are reflected as expected and adjust placement if necessary.
{% endhint %}